By Shane Folden, Gravity Jack Videographer & 3D Artist
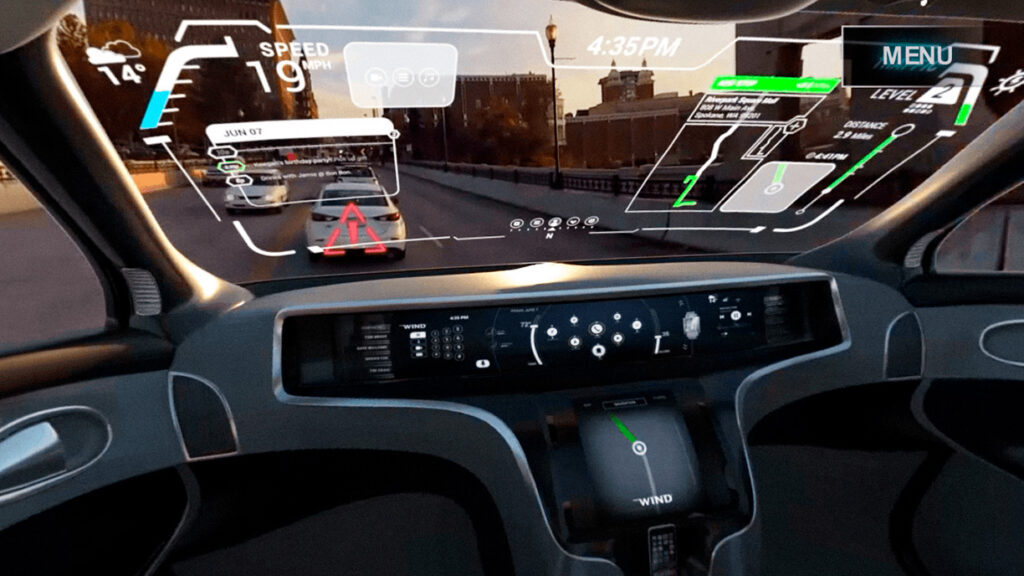
Here at Gravity Jack, we recently completed a virtual reality (VR) project for Wind River (an Intel Company). The goal: Show users what it will be like to drive in an autonomous, self-driving car in the very near future!
This was, of course, a fun project for Gravity Jack — but not without its challenges. Notably, compositing 3D elements seamlessly into a 360º VR scene.
Interior Effects & Mapping Texture
When the experience begins, users find themselves sitting in the driver’s (or non-driver’s, if you will) seat of a futuristic, self-driving car. Throughout the experience, the windows and dash of the vehicle display a wide range of effects, including the user’s route, weather reports, music and entertainment features, and other useful information that people may like to see while being driven around town.
In addition to creating and attaching these effects to the interior of the car, we also needed to place additional effects on the road’s surface and other passing vehicles in the scene.
In order to solve the interior needs, Gravity Jack rendered all of the effects onto a flat plane. Once complete, we then mapped the texture to the 3D model. Easy! Done.
Exterior Scene Elements
The exterior effects for this project proved more difficult than originally anticipated.
For this challenge, we used Mettle’s 360 software within After Effects. Doing this allowed us to break the equirectangular image into 6 individual images.
Side note: “Equirectangular” is just a fancy word for the unwrapped version of a 360º video. Imagine a cardboard box that has been taken apart, each panel of the cube is a different image.
The purpose of this step is to effectively track the scene and place objects in the scene as though it were a normal, two-dimensional video. Once this is complete, we are able to take the six individual images and combine them, seamlessly, into one equirectangular image or video (for this case, it was video).
The Mission At Hand
We needed to place a green and red highlight on the road as the car traveled. Red, showing where the user could not travel due to a wreck or construction, and green to show an alternate route for the user.
To do this, we placed the plane onto the road surface and tracked it to the scene. This makes the plane “stick” to the road, ensuring it does not move around with the video. Ultimately, this effect gives the illusion that the green and red planes were part of the scene.
Up to this point — so far, so good. That was, until we start driving “over” the plane.
The Issues We Encountered
The first issue we encountered was that the 3D model of the vehicle limited the visibility of the road surface, directly in front of the car. Unfortunately, we only had about 5 seconds of video to work with for this particular scene. We needed to convey the fact that the plane on the ground was part of the scene and not just a brief flash of color.
Our second issue was that all of the windows on the car were transparent, allowing users to look around within the scene and be fully immersed. When we tracked the plane and placed it in the scene, it matched up and we were able to briefly drive over it; however, when we looked out the driver side window, rather than seeing a soft lit path, we saw a hard-edged green square that had been cut off by the other images.
Dang.
This let us know that it had only been tracked within the front facing image.
Naturally, we went back and tried to track the plane in the other image views as well. The end result was a very sloppy look. Regardless of what we tried, getting the images to line up with each other (and seamlessly within the scene) proved entirely too difficult. So, that idea went…out the window. 😉
The Solution
Instead of trying to track the plane in a 360º space, we simply added it to the front windshield of the car and masked off the sections that would pull users out of the immersion. This made two important things possible:
A) Users could drive along the plane for as long as we wished, as it was now part of the car.
B) We could now allow the plane to pass by the car on the side windows, which masked out the section we didn’t want the user to see.
Additionally, we were now able to manually track the plane to fit naturally within the scene. Doing this ensured it was flat on the road, curved with the road, and didn’t jump onto the sidewalk or parked cars.
It was a perfect fit!
Our Takeaway
Our takeaway from all of this: Don’t make life more difficult by trying to overdo/overthink your effects. KISS (keep it simple stupid).
The solution was actually the fastest and most effective way to get our point across. Moving forward, we will continue to place 3D objects into a 360º scene, pushing the boundaries of our abilities every chance we get.
From time to time it’s important to take a step back and analyze what is truly needed and allow ourselves as creatives to step ‘outside of the box.’
To see the final experience for yourself, you can download the free Wind River Experience app for both iOS and Android.
If you’re a videographer, 3D artist or developer running into similar struggles, feel free to reach out to us with your question! We’re always happy to help answer questions!